Thanks to everybody for the positive feedback on the first MIRE. I still have your attention, so I’ll move on to my next exercise. This one is a little more involved than the first, but bear with me - the results should be worth it.
The Problem
I have been a big fan of Celtic knotwork for many years, and have been drawing it myself as an occasional distraction for most of that time. I don’t think I’m very good at it, but I’ve occasionally made myself proud. Heck, I’ve even designed a couple tattoos for folks, making a few bucks in the process. Any time you can profit from your hobbies is good. Any time somebody likes your work so much that they want it embedded in their skin with a sharp needle is also good.
My preferred technique has always been manual and therefore labor-intensive. You lay out a grid, block out your major areas, draw your knotwork paths, and then embellish a little for personality. It’s simple and repetitive, and I like it that way. There’s a meditative element to such things which can’t be ignored. Still, I’m here to write a programming exercise, not to wax eloquently about the virtues of being hunched over a sheet of paper for hours at a time.
Any time a geek hears the phrase “simple and repetitive,” the geek’s mind turns to ways of automating the task being described. Well, this geek’s mind does. I wonder how hard it would be to write a Ruby program which could, given some dimensions by the user, create a simple knotwork panel of the desired size and then write that panel to an image file?
Finding a Solution
As it turns out, somebody else has already solved a fair chunk of the problem. Andy Sloss’s book How to Draw Celtic Knotwork: A Practical Guide provides a detailed overview of his approach, which essentially boils down to arranging a set of image tiles on a grid so that the end result looks like an attractive knotwork image. He’s even gone so far as to provide each of the tiles that can be used in his system.
The Plan
This project is a little more complicated than the last MIRE, so I want to step through it a little more carefully. Actually, it’s not more complicated. It’s just that less of the work has already been done for me. Instead of jumping right into creating bitmap images on the fly, I’m going to use ASCII art to create my knotwork at first.
Let’s step through what we’ll be doing later in code. Here is a collection of image tiles arranged in a grid.
. . . . x x x x x  x x . . . . . x x  x x x x x . . . .. . . . x . . . .  . . x x . x x . .  . . . . x . . . .. . . . x . . . x  . . . . x . . . .  x . . . x . . . .. . . . x . . x .  x x . . . x . x x  . x . . x . . . .. . . . x . . x .  . . x . . . x . .  . x . . x . . . .. . . . . x . . x  x . . . x . . . x  x . . x . . . . .. . . . . x . . x  . . . x . x . . x  . . . x . . . . .. . . . . . x x .  . . x . . . x x .  . . x . . . . . .
. . . . . . x . .  . . x . . . x . .  . x x . . . . . .. . . . . x . . .  . x . x . x . . .  x . . x . . . . .. . . . . x . . .  x . . . x . . . x  x . . x . . . . .. . . . x . . . x  . x . . . x . x .  . x . . x . . . .. . . . x . . x .  . . x . . . x . .  . x . . x . . . .. . . . x . . x .  . x . x . . . x .  . x . . x . . . .. . . . . x . . x  x . . . x . . . x  x . . x . . . . .. . . . . x . . x  . . . x . x . x .  . . . x . . . . .. . . . . . x x .  . . x . . . x . .  . . x . . . . . .
. . . . . . x . .  . x x . . . x . .  . x x . . . . . .. . . . . x . . .  x . . x . x . . .  x . . x . . . . .. . . . . x . . x  x . . . x . . . x  x . . x . . . . .. . . . x . . x .  . x . . . x . x .  . x . . x . . . .. . . . x . . x .  . . x . . . x . .  . x . . x . . . .. . . . x . . . x  x x . x . . . x x  x . . . x . . . .. . . . x . . . .  . . . . x . . . .  . . . . x . . . .. . . . x . . . .  . . x x . x x . .  . . . . x . . . .. . . . x x x x x  x x . . . . . x x  x x x x x . . . .
Squish them together into one big image, and guess what? We have a knot!
. . . . x x x x x x x . . . . . x x x x x x x . . . .. . . . x . . . . . . x x . x x . . . . . . x . . . .. . . . x . . . x . . . . x . . . . x . . . x . . . .. . . . x . . x . x x . . . x . x x . x . . x . . . .. . . . x . . x . . . x . . . x . . . x . . x . . . .. . . . . x . . x x . . . x . . . x x . . x . . . . .. . . . . x . . x . . . x . x . . x . . . x . . . . .. . . . . . x x . . . x . . . x x . . . x . . . . . .. . . . . . x . . . . x . . . x . . . x x . . . . . .. . . . . x . . . . x . x . x . . . x . . x . . . . .. . . . . x . . . x . . . x . . . x x . . x . . . . .. . . . x . . . x . x . . . x . x . . x . . x . . . .. . . . x . . x . . . x . . . x . . . x . . x . . . .. . . . x . . x . . x . x . . . x . . x . . x . . . .. . . . . x . . x x . . . x . . . x x . . x . . . . .. . . . . x . . x . . . x . x . x . . . . x . . . . .. . . . . . x x . . . x . . . x . . . . x . . . . . .. . . . . . x . . . x x . . . x . . . x x . . . . . .. . . . . x . . . x . . x . x . . . x . . x . . . . .. . . . . x . . x x . . . x . . . x x . . x . . . . .. . . . x . . x . . x . . . x . x . . x . . x . . . .. . . . x . . x . . . x . . . x . . . x . . x . . . .. . . . x . . . x x x . x . . . x x x . . . x . . . .. . . . x . . . . . . . . x . . . . . . . . x . . . .. . . . x . . . . . . x x . x x . . . . . . x . . . .. . . . x x x x x x x . . . . . x x x x x x x . . . .You don’t quite see it? Well, squint a little and tilt your head a bit. Still nothing? Just bear with me. We will get to actual pictures soon, I promise.
Okay, let’s find a way to automate this process.
Turning the Plan Into Code
This works, doesn’t it?
knot =<<HERE     . . . . x x x x x x x . . . . . x x x x x x x . . . .     . . . . x . . . . . . x x . x x . . . . . . x . . . .     . . . . x . . . x . . . . x . . . . x . . . x . . . .     . . . . x . . x . x x . . . x . x x . x . . x . . . .     . . . . x . . x . . . x . . . x . . . x . . x . . . .     . . . . . x . . x x . . . x . . . x x . . x . . . . .     . . . . . x . . x . . . x . x . . x . . . x . . . . .     . . . . . . x x . . . x . . . x x . . . x . . . . . .     . . . . . . x . . . . x . . . x . . . x x . . . . . .     . . . . . x . . . . x . x . x . . . x . . x . . . . .     . . . . . x . . . x . . . x . . . x x . . x . . . . .     . . . . x . . . x . x . . . x . x . . x . . x . . . .     . . . . x . . x . . . x . . . x . . . x . . x . . . .     . . . . x . . x . . x . x . . . x . . x . . x . . . .     . . . . . x . . x x . . . x . . . x x . . x . . . . .     . . . . . x . . x . . . x . x . x . . . . x . . . . .     . . . . . . x x . . . x . . . x . . . . x . . . . . .     . . . . . . x . . . x x . . . x . . . x x . . . . . .     . . . . . x . . . x . . x . x . . . x . . x . . . . .     . . . . . x . . x x . . . x . . . x x . . x . . . . .     . . . . x . . x . . x . . . x . x . . x . . x . . . .     . . . . x . . x . . . x . . . x . . . x . . x . . . .     . . . . x . . . x x x . x . . . x x x . . . x . . . .     . . . . x . . . . . . . . x . . . . . . . . x . . . .     . . . . x . . . . . . x x . x x . . . . . . x . . . .     . . . . x x x x x x x . . . . . x x x x x x x . . . .HERE
puts knot
I know, “Ha ha, very funny. You are so clever and witty. We are being sarcastic, if you didn’t guess, Mister Writer.” I know that this is cheating, but it works doesn’t it? This would be good enough if all you wanted was some sort of ASCII art knot.
Then again, Laziness taken too far does become plain old laziness. This isn’t good enough for any of us. The idea is to be able to draw a knotwork panel of any size that we want.
Let’s look at the nouns we’ve used when describing the problem:
We want to create a knotwork panel by arranging tiles on a grid, then merging them into a single image.
- knotwork panel - I threw the adjective in for a little descriptiveness
- grid
- tile
- image
I think these nouns make a good start for the class names in our program.
Zenspider once mentioned a style of commenting classes that was like the classes were describing themselves in the first person. I don’t know why, but I really liked that concept. I’ve stuck with it in a lot of my own code ever since.
# I am a single small section of a knotwork image. I know about my# dimensions, and can describe myself on a pixel-by-pixel basis.class Tileend
# I am a 2-dimensional collection of tiles. I know where each of my Tiles arelocated, and can describe them as if they were a single large entity.class Gridend
# I am a lovely Celtic knotwork panel. I know my dimensions, and can output myself# as ASCII art.class KnotworkPanelend
# I know how to create a graphical representation of a KnotworkPanelclass Imageend
Now I know each of the major objects in this program, and the duties that they must fill. It’s time to blaze through the highlights of writing the code. For convenience, we can put the application code and the testing code in the same file for now.
Building a Tile
The simplest element of our description is the Tile. I decided that a Tile would be a two dimensional chunk of characters that would let you set or get any point in that space. Remember that this isn’t the only way we could have done things. You could also describe the lines and curves in the tile, or the colors, transparency, and whatever else the crazy kids are coming up with these days. This is my first drawing program, though, and I want to keep it as simple as I can. So I’m going with the bitmap idea. The tile images in the Sloss book are provided in different sizes. Let’s go with 9x9. It’s small and manageable without being too small to see.
knotwork/tile.rb
TILE_SIZE = 9
# I am a single small section of a knotwork image. I know about my# dimensions, and can describe myself on a pixel-by-pixel basis.class Tile
  def initialize(str = nil)    @pixels = Array.new(TILE_SIZE) { Array.new(TILE_SIZE) }
    if str then      set_from_string(str)    end  end
  def at(x, y)    return @pixels[x][y]  end  alias is_set? at
  def set(x, y, value=true)    @pixels[x][y] = value  end
  def unset(x, y)    self.set x, y, nil  end
  def set_from_string(str)    str.split("\n").each_with_index do |line, row|      line.split(' ').each_with_index do |pixel, col|        set(row, col, pixel)      end    end  end
  def to_s    str = ""    @pixels.each { |row|      str += "|"      row.each { |pixel|        pixel ||= " "        str += "#{pixel}|"      }      str += "\n"    }    return str  endend
I’ll write tests with the rock-solid Minitest testing library.
tests/test_tile.rb
require "minitest/autorun"require "../knotwork/tile.rb"
class TestTile < Minitest::Test  def setup    @tile = Tile.new  end
  def test_pixels    refute @tile.is_set?(0, 0),      "By default, any pixel in a Tile is blank"
    assert @tile.set(0, 0),      "Use Tile#set(row, col) to set a pixel at coordinates (row, col)"
    assert @tile.is_set?(0, 0),      "A pixel (row, col) is set after Tile#set(row, col) has been called"
    @tile.unset 0, 0    refute @tile.is_set?(0, 0),      "An unset pixel has no set value"
    @tile.set(1, 1)    refute @tile.is_set?(0, 0),      "Setting one pixel has no effect on other pixels in a Tile"
    assert @tile.is_set?(1, 1),      "Tile remembers the set status of each pixel in its confines."  end
  def test_set_from_string    source_string =<<~HERE.strip      x . . . . . . . x      . x . . . . . x .      . . x . . . x . .      . . . x . x . . .      . . . . x . . . .      . . . x . x . . .      . . x . . . x . .      . x . . . . . x .      x . . . . . . . x    HERE
    assert @tile.set_from_string(source_string),      "You can use ASCII art strings to set the pixels in a Tile"
    assert @tile.is_set?(0, 0)    assert @tile.is_set?(1, 0)
    assert_equal 'x', @tile.at(0, 0),      "A Tile remembers the value assigned, if given, during Tile#set(row, col, val)"  endend
This is — 2020 note: my early attempt at — Test-Driven Development, where you write the tests for your code as you are writing the code itself. A little before the code itself, actually. TDD is useful for any non-trivial programming task. You have the tests there right from the beginning to describe what your classes are supposed to be able to do. Because TDD is based on lots of tiny changes being applied rapidly over time, I decided it would be tedious to describe that process to you at each little step. Instead, we stop and take a snapshot as we get each major stage accomplished. Like that code sample up there. It’s really where I’m at right about now. See: there’s the class definition, a couple of very basic accessors, and the ability to set all the pixels of a Tile at once from a String.
Now that the Tile is pretty much doing everything I want it to, let’s move on to the Grid.
Putting the Tile in a Grid
I want to hurry on to making pictures, so let’s rush through the Grid part.
That’s easy enough, actually. We only need to be able to do a few simple things with a Grid:
- Create it at a set size.
- Add a Tile somewhere in the Grid.
- Read each individual pixel of the Grid transparently.
And here’s the code.
# I am an arranged collection of Tiles. I know how to add and remove# Tiles along a 2-d grid, and can also present myself as if I were a single# large Tile.
require "tile"
class Grid  def initialize(rows, columns)    @tile_size = TILE_SIZE    @rows      = rows    @columns   = columns    @pixels    = Array.new(rows*@tile_size) { Array.new(columns*@tile_size) }  end
  def set_tile(row, column, tile)    pixel_origin_x = row * @tile_size    pixel_origin_y = column * @tile_size
    @tile_size.times do |tile_x|      x = pixel_origin_x + tile_x
      @tile_size.times do |tile_y|        y = pixel_origin_y + tile_y        @pixels[x][y] = tile.at tile_x, tile_y      end    end  end
  def at(row, column)    return @pixels[row][column]  end
  def to_s    str = ""    @pixels.each { |row|      str += row.join(' ') + "\n"    }
    return str.chomp  end
endrequire "minitest/autorun"require "../knotwork/grid"
class TestGrid < Minitest::Test def setup @source_string =<<~HERE.strip x . . . . . . . x . x . . . . . x . . . x . . . x . . . . . x . x . . . . . . . x . . . . . . . x . x . . . . . x . . . x . . . x . . . . . x . x . . . . . . . x HERE end
def test_simple_grid grid = Grid.new 1, 1 tile = Tile.new @source_string grid.set_tile 0, 0, tile assert_equal "x", grid.at(0, 0), "pixel_at fetches contents from pixel coordinates"
assert_equal @source_string, grid.to_s end
def test_large_grid grid = Grid.new 1, 2 tile1 = Tile.new @source_string tile2 = Tile.new @source_string grid.set_tile 0, 0, tile1 grid.set_tile 0, 1, tile2 assert_equal "x", grid.at(0, 9), "pixel_at fetches from anywhere in the Grid."
expected_output =<<~HERE.strip x . . . . . . . x x . . . . . . . x . x . . . . . x . . x . . . . . x . . . x . . . x . . . . x . . . x . . . . . x . x . . . . . . x . x . . . . . . . x . . . . . . . . x . . . . . . . x . x . . . . . . x . x . . . . . x . . . x . . . . x . . . x . . . x . . . . . x . . x . . . . . x . x . . . . . . . x x . . . . . . . x HERE
assert_equal expected_output, grid.to_s endendThere, that’s another fifteen minutes of coding done. Yes, the combination of TDD and Ruby makes it about this easy to write a program.
Using the Grid to Make a KnotworkPanel
Things get a little more complex now, because we’re on to creating a KnotworkPanel. Every KnotworkPanel uses a specific set of predefined tiles — thanks again to Andy Sloss for going to the trouble of defining them — which I will store as class variables. I would probably store them in a different file if I wanted to include every Tile defined in Sloss’s book, but that’s more than I want to chew on today.
Certain Tiles must go in certain locations of the KnotworkPanel’s Grid, such as the corners and edges, and we have to remember this in our tests. Ah, let’s just cut and paste the source strings and squish them together so that they look like what we’re aiming for. That’s probably the easiest test for now.
For a while, my problem was that I was copying and pasting incorrectly. Don’t
ask me how I pull this stuff off. I’m just special, I guess. The test results
would end up spewing out “Expected ”… a really long chain of x and .
characters, ” but got ” … a really long chain of x and . characters, almost
identical to the first chain. My solution? Test each row of output, that way I
see exactly which line was one character off.
require "tile"require "grid"
# «define-tile-maps»# «define-knotwork-panel-class»NW_CORNER =<<~HERE.strip . . . . x x x x x . . . . x . . . . . . . . x . . . . . . . . x . . . x . . . . x . . x . . . . . x . . x . . . . . . x . . x . . . . . x . . x . . . . . . x x .HERE
N_EDGE =<<~HERE.strip x x . . . . . x x . . x x . x x . . . . . . x . . . . x x . . . x . x x . . x . . . x . . . x . x . . . x . x . . . x . . . x . . . x . x . . x . . x . . . x x .HERE
NE_CORNER =<<~HERE.strip x x x x x . . . . . . . . x . . . . . . . . x . . . . x . . . x . . . . . x . . x . . . . . x . . x . . . . x . . x . . . . . . . . x . . . . . . . x . . . . . .HERE
W_EDGE = <<~HERE.strip . . . . . . x . . . . . . . x . . . . . . . . x . . . . . . . x . . . x . . . . x . . x . . . . . x . . x . . . . . . x . . x . . . . . x . . x . . . . . . x x .HERE
CENTER = <<~HERE.strip . . x . . . x . . . x . x . x . . . x . . . x . . . x . x . . . x . x . . . x . . . x . . . x . x . . . x . x . . . x . . . x . . . x . x . x . . . x . . . x . .HERE
E_EDGE = <<~HERE.strip . x x . . . . . . x . . x . . . . . x . . x . . . . . . x . . x . . . . . x . . x . . . . . x . . x . . . . x . . x . . . . . . . . x . . . . . . . x . . . . . .HERE
SW_CORNER = <<~HERE.strip . . . . . . x . . . . . . . x . . . . . . . . x . . x . . . . x . . x . . . . . x . . x . . . . . x . . . x . . . . x . . . . . . . . x . . . . . . . . x x x x xHERE
S_EDGE = <<~HERE.strip . x x . . . x . . x . . x . x . . . x . . . x . . . x . x . . . x . x . . . x . . . x . . x x . x . . . x x . . . . x . . . . . . x x . x x . . x x . . . . . x xHERE
SE_CORNER = <<~HERE.strip . x x . . . . . . x . . x . . . . . x . . x . . . . . . x . . x . . . . . x . . x . . . . x . . . x . . . . . . . . x . . . . . . . . x . . . . x x x x x . . . .HERE# I am a lovely Celtic knotwork panel. I know my dimensions, and can output# myself as ASCII art.class KnotworkPanel @@top_left = Tile.new NW_CORNER @@top = Tile.new N_EDGE @@topright = Tile.new NE_CORNER @@left = Tile.new W_EDGE @@center = Tile.new CENTER @@right = Tile.new E_EDGE @@bot_left = Tile.new SW_CORNER @@bottom = Tile.new S_EDGE @@botright = Tile.new SE_CORNER
def initialize(rows, columns=rows) @row_size = rows + 2 @col_size = columns + 2 @grid = Grid.new @row_size, @col_size
# Set the top row. @grid.set_tile 0, 0, @@top_left @grid.set_tile 0, @col_size-1, @@topright
(1...@col_size-1).each { |i| @grid.set_tile 0, i, @@top }
# Set the center rows. (1...@row_size-1).each do |i| @grid.set_tile i, 0, @@left @grid.set_tile i, @col_size-1, @@right
(1...@col_size-1).each { |j| @grid.set_tile i, j, @@center } end
# Set the bottom row @grid.set_tile @row_size-1, 0, @@bot_left @grid.set_tile @row_size-1, @col_size-1, @@botright
(1...@col_size-1).each { |i| @grid.set_tile @row_size-1, i, @@bottom } end
def to_aa() return @grid.to_s end
endrequire "minitest/autorun"require "../knotwork/knotwork_panel"
class TestKnotworkPanel < Minitest::Test def test_ascii panel = KnotworkPanel.new(1) expected_lines =<<~HERE.strip.split "\n" . . . . x x x x x x x . . . . . x x x x x x x . . . . . . . . x . . . . . . x x . x x . . . . . . x . . . . . . . . x . . . . . . . . x . . . . . . . . x . . . . . . . . x . . . x x x . . . x . x x x . . . x . . . . . . . . x . . x . . . x . . . x . . . x . . x . . . . . . . . x . . x . . x . x . . . x . . x . . x . . . . . . . . . x . . x x . . . x . . . x x . . x . . . . . . . . . . x . . x . . . x . x . . x . . . x . . . . . . . . . . . x x . . . x . . . x x . . . x . . . . . . . . . . . . x . . . . x . . . x . . . x x . . . . . . . . . . . x . . . . x . x . x . . . x . . x . . . . . . . . . . x . . . x . . . x . . . x x . . x . . . . . . . . . x . . . x . x . . . x . x . . x . . x . . . . . . . . x . . x . . . x . . . x . . . x . . x . . . . . . . . x . . x . . x . x . . . x . . x . . x . . . . . . . . . x . . x x . . . x . . . x x . . x . . . . . . . . . . x . . x . . . x . x . x . . . . x . . . . . . . . . . . x x . . . x . . . x . . . . x . . . . . . . . . . . . x . . . x x . . . x . . . x x . . . . . . . . . . . x . . . x . . x . x . . . x . . x . . . . . . . . . . x . . x x . . . x . . . x x . . x . . . . . . . . . x . . x . . x . . . x . x . . x . . x . . . . . . . . x . . x . . . x . . . x . . . x . . x . . . . . . . . x . . . x x x . x . . . x x x . . . x . . . . . . . . x . . . . . . . . x . . . . . . . . x . . . . . . . . x . . . . . . x x . x x . . . . . . x . . . . . . . . x x x x x x x . . . . . x x x x x x x . . . . HERE
output_lines = panel.to_aa.split "\n" expected_lines.each_with_index do |line, i| assert_equal line, output_lines[i], "line #{i} doesn't match" end end
def test_large_panels expected =<<~HERE.strip . . . . x x x x x x x . . . . . x x x x x x x . . . . . . . . x . . . . . . x x . x x . . . . . . x . . . . . . . . x . . . . . . . . x . . . . . . . . x . . . . . . . . x . . . x x x . . . x . x x x . . . x . . . . . . . . x . . x . . . x . . . x . . . x . . x . . . . . . . . x . . x . . x . x . . . x . . x . . x . . . . . . . . . x . . x x . . . x . . . x x . . x . . . . . . . . . . x . . x . . . x . x . . x . . . x . . . . . . . . . . . x x . . . x . . . x x . . . x . . . . . . . . . . . . x . . . . x . . . x . . . x x . . . . . . . . . . . x . . . . x . x . x . . . x . . x . . . . . . . . . . x . . . x . . . x . . . x x . . x . . . . . . . . . x . . . x . x . . . x . x . . x . . x . . . . . . . . x . . x . . . x . . . x . . . x . . x . . . . . . . . x . . x . . x . x . . . x . . x . . x . . . . . . . . . x . . x x . . . x . . . x x . . x . . . . . . . . . . x . . x . . . x . x . x . . . . x . . . . . . . . . . . x x . . . x . . . x . . . . x . . . . . . . . . . . . x . . . . x . . . x . . . x x . . . . . . . . . . . x . . . . x . x . x . . . x . . x . . . . . . . . . . x . . . x . . . x . . . x x . . x . . . . . . . . . x . . . x . x . . . x . x . . x . . x . . . . . . . . x . . x . . . x . . . x . . . x . . x . . . . . . . . x . . x . . x . x . . . x . . x . . x . . . . . . . . . x . . x x . . . x . . . x x . . x . . . . . . . . . . x . . x . . . x . x . x . . . . x . . . . . . . . . . . x x . . . x . . . x . . . . x . . . . . . . . . . . . x . . . x x . . . x . . . x x . . . . . . . . . . . x . . . x . . x . x . . . x . . x . . . . . . . . . . x . . x x . . . x . . . x x . . x . . . . . . . . . x . . x . . x . . . x . x . . x . . x . . . . . . . . x . . x . . . x . . . x . . . x . . x . . . . . . . . x . . . x x x . x . . . x x x . . . x . . . . . . . . x . . . . . . . . x . . . . . . . . x . . . . . . . . x . . . . . . x x . x x . . . . . . x . . . . . . . . x x x x x x x . . . . . x x x x x x x . . . . HERE
output_lines = KnotworkPanel.new(2, 1).to_aa.split "\n" expected.split("\n").each_with_index do |line, i| assert_equal line, output_lines[i], "line #{i} doesn't match" end endendYeah, that works. Let’s move on.
Creating an Image of the KnotworkPanel
I bet you feel really cheated by now. I’ve been going on for all this time about celtic knotwork and drawing pictures with the computer. All you’ve seen is a bunch of dots and crosses that kind of look like a picture if you go cross-eyed for a second. You can cheer up, folks, because you’ve finished the boring part. Now we want to make a real live picture!
But how are we going to do it? You know that I’m not about to go making my own image creation library for a little project like this — or any other project, if I can help it.
No need. The RMagick library wraps around ImageMagick for all the image generating power I need today.
require 'rmagick'include Magick
class KnotworkPanel  def to_image()    filename = "panel-#{@row_size}x#{@col_size}.png"
    max_x = 9 * @row_size    max_y = 9 * @col_size
image = Image.new(max_x, max_y) { self.background_color = "white" } (0...max_y).each do |y| (0...max_x).each do |x| pixel = @grid.at(x, y) if pixel == "x" then image.pixel_color(x, y, "black") end end end image.write(filename) endendTime to make an image.
require './knotwork/knotwork_panel.rb'
# «knotwork-image-logic»
panel = KnotworkPanel.new(8, 18)panel.to_image()
Thanks to all the work we did building Tiles and Grids and ASCII art KnotworkPanels, we only need to add a few lines to allow KnotworkPanels to create a nice black and white PNG image file. Here’s what we get:
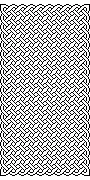
Cool, eh?
Building KnotworkPanels of Any Size
Now the program does what I want it to. But if I hand this script off to somebody else and say “This program will make knotwork panels of any size,” one of their first questions will be how to set the size. “Go in and edit the code” won’t cut it. Let’s haul out our trusty OptParse library again.
def main  rows = 1  columns = 1
  opts = OptionParser.new do |opts|    opts.banner = "Usage #{$0} |opts|"    opts.separator ""    opts.separator "Specific Options"
    opts.on("-r", "--rows [ROWS]",            "Number of rows for this panel (default 1)") do |r|      rows = r.to_i      columns = rows    end
    opts.on("-c", "--columns [COLUMNS]",            "Number of columns for this panel (default ROWS)") do |c|      columns = c.to_i    end
    opts.on_tail("-h", "--help",                 "Show this message") do      puts opts      exit    end  end
  opts.parse!
  panel = KnotworkPanel.new(rows, columns)  panel.to_image()end
Running it with the default should result in a 3x3 panel:
$ ruby knotworkpanel.rb![]()
Setting rows to 2 results in a 4x4 panel.
$ ruby knotworkpanel.rb --rows 2![]()
Ignoring me from the future for today, let’s see what happens when we try to make a nice big KnotworkPanel.
$ ruby knotworkpanel.rb --rows 98 --columns 73Hmm … took a few seconds this time. If I cared about performance, I might go in and see where this could be tightened up. I don’t care about performance today, though. I care about results. And the results aren’t too bad.
Cleaning Up
Okay, it’s done! That is to say, it does all the things I want it to for now. There’s a lot more stuff that I would like to do with this program, but it’s important to know when to stop and take a breath. Let’s just go back and clean up the code a little bit. Not actually change any functionality or user interface, so Me From The Future is just going to have to wait. I only want to make it easier to read the code that I have already written.
require './knotwork/knotwork_panel.rb'
# «knotwork-image-logic»
# «main-with-option-parser»
main
Conclusion
Okay, so that’s about it. We’ve gone from an idea to a program that creates png formatted images of Celtic-style knotwork panels. Not bad at all. There are a lot of other things we could do with this program, though.
Here are a few ideas:
- Come up with some good ideas for unit testing the image generation code. Then send them to me :smile:
- Antialias the lines for a smoother effect.
- Add color.
- Incorporate the rest of the patterns detailed in the Andy Sloss book.
- Add the ability to make complex panels.
- Add the ability to scale pattern panels to any size.
- Make Me From The Future happy by fine-tuning the KnotworkPanel initializer and/or the OptParse options so that the user gets a 3x3 panel when they request a 3x3 panel. Oh, but what happens when the user requests a 1x1 panel? I guess you’ll have to figure that out.
- Done already? Andy Sloss also wrote a book using similar techniques for drawing key patterns. Go write that program, and merge it with this one for a lean, mean, Celtic-art producing machine.